I recently bought a DJI Flamewheel F450 kit to see if I could build it myself. As it turns out there is a wealth of information on the construction of the F450 out there so it was relatively easy. What was not so easy, however, was setting up the transmitter and receiver correctly; there was always some part that wasn't quite right or was missing or didn't work as expected.
Part of the problem was that I had decided to use the AR610 receiver that came with the Spektrum DX6 that I already had, instead of staying with DJI and getting their tx/rx combo. It worked well enough but I couldn't get the preset failsafe to work. In the end, after many hours watching videos and reading and rereading the manuals here is what I did - and bear in mind that this is mainly an aide memoire for myself:
Connections
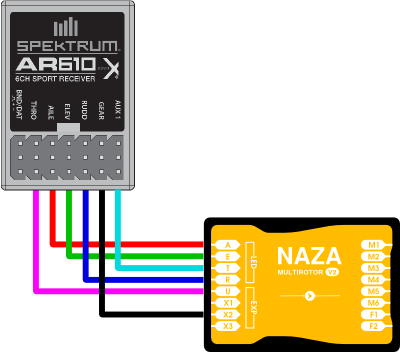
Whilst the AR610 does have preset failsafe, it only works on the throttle channel. This means that the Naza's Flight Mode must be controlled by the AR610's throttle channel. In turn this means that we need another channel to control the Naza's throttle; for this we can use the pitch channel. Now we can use the gear channel on the AR610 to control the AX2 channel on the Naza. Clear as mud, right? Here's a schematic showing the connections:
Why do we need to go through all this complexity? As I mentioned, the AR610 has a Preset Failsafe, but it only controls the throttle. On the controller, with the model set to Airplane, the throttle controls just the throttle. We could use the usual failsafe of closing the throttle but, while an airplane will continue to glide without power, a rotary vehicle just drops like a stone; this is less than optimal. If, however, the model is set to Helicopter the throttle on the controller controls both throttle and pitch, allowing us to set separate throttle and pitch curves; the pitch is in fact slaved to the Aux1 channel in the Spektrum. The Naza-M sets failsafe mode by adjusting its U channel which is slaved to a 3-position switch on the controller, usually Flight Mode. We can take advantage of this by using the throttle channel to control the Flight Mode and the pitch channel to control the throttle. The IOC function will be controlled by the Gear channel.
The following setup will give Flight Mode on the left of the controller at Switch B, IOC on the right on Switch G and Failsafe on Switch H.
Controller Setup
Once the connections have been made it is time to set up the DX6.
First of all create a new model of type Helicopter - The instructions say to use an Airplane model, but we want pitch slaved to Aux1. Name it as you will. Now, still in System Setup, check that Swash Type is Normal and then go into Flight Mode Setup. Set Switch 1 to Switch B and Hold Switch to Switch H, making sure to set the up position of the switch to active (black). Check that the functions are as expected. Now go into Spoken Flight Mode and set the Hold switch (now H) to up or on and set the Speak field to < Silence >. This will prevent it saying 'Hold' when we later set it to say 'Failsafe'.
In Channel Assign, on the second page (Channel Input Config) make sure that GEAR is set to G.
In Warnings turn everything off for now, we will set these up after binding for failsafe.
In Digital Switch Setup make sure that Switch G is bound to channel Gear and that Pos 0 to 2 are 100%, 0 and -100%.
Now back out into the model screen and press the roller for the main Function List.
In servo Setup select Reverse and reverse the sense of both Aileron and Rudder so that they will match the readouts in the NAZA M setup program later.
We do not need D/R and Expo, but you can set some expo if you want.
Next make sure that Throttle Cut is inhibited.
In throttle curve we need to set the levels that will trigger the GPS, Atti and Manual states on the Naza's U channel as well as the Failsafe position. So for Normal Mode (which will be GPS) set the throttle to 95% across the board. In position 1 (ATTI) set 53% on all and in position 2 (Manual) set all to 11%. Now set H (Failsafe) to 33%. All these settings will become clearer when we connect it all up and view them in the Naza Setup program.
I also recommend that you set up some spoken alerts for the switches we have just set up, so go into Custom Voice Setup, Add a New Sound Event and set Switch to Switch G, Pos 0 to Smart Mode, Pos 1 to Course Lock Mode and Pos 2 to Home Lock Mode. Then add another New Sound Event and set Switch H to Pos 0 <Silence> and Pos 1 to Failsafe. This means that when you move Switch H to Position 1 (active) it will say 'Failsafe' and when you move back to Position 0 (inactive) it will say the Flight Mode you have on Switch B.
Naza Assistant Setup
Now we shall check that everything is working by connecting the F450 to the computer running Naza M Assistant. Before you do any of the following make sure you
REMOVE THE PROPELLORS FROM THE F450
This is a basic safety precaution - nothing should happen because the system is not armed but better safe than shredded.
First bind the controller to the receiver using the bind plug in the usual way. Connect the Naza LED Module to the computer and run the Naza M Assistant software. Now you can carry on with setting up the system according to the instructions.
When you get to RC settings on the Basic page, check that the sticks match the input required in the Assistant. If you need to reverse a channel, I find it best to do so on the controller in Servo Setup so that the Assistant shows all normal. Now calibrate the sticks.
Move the Flight Mode switch on the controller and check that it does in fact select the correct flight mode. If not, you will need to adjust the settings slightly on the controller in Throttle Curve. Check each position including Failsafe several times, making sure that the indicator falls in the middle of the required range in the Assistant.
I recommend that you set Landing as opposed to Go-Home and Landing in the F/S tab of the Advanced menu while you are testing the system. Once you are happy that it is all working, you can set it as you want.
When you get to IOC under the Advanced tab do the same as with the Flight Mode using the G Switch. The settings can be adjusted on the controller in Servo Setup by setting the travel for the gear channel.
Once you have finished with the Assistant power everything down and disconnect the F450. Insert the bind plug into the AR610 and power up. The AR610 will flash rapidly. Now remove the bind plug - the AR610 will continue to flash. Now set the H Switch to Failsafe and power on the controller while holding down the bind/trainer button as normal. Once bound power off the F450 and Controller.
Now try a normal start up, first the controller then the F450 and check that the light sequence is as advertised in the instructions. Check that the lights change as they should for the various modes. If all is well now power off the controller. The Naza M should go into Failsafe as indicated by the flashing orange light. Once you power on the controller again the Naza M should revert to whatever setting you had previously.
Finals
Now that everything is working I recommend that you reset the warnings that were removed previously to stop the controller complaining. On the controller go to the Warnings page and set what you want. I have them set as follows: Alarm: Voice,Throttle Over: 10%, Gyro: none, Hold: Active (1), FlightMode: 1 & 2, Chan: Gear: Under 10%,Chan: Inhibit. Don't forget to set your failsafe to 'Return and Land' or just 'Land' as you want in the Assistant.
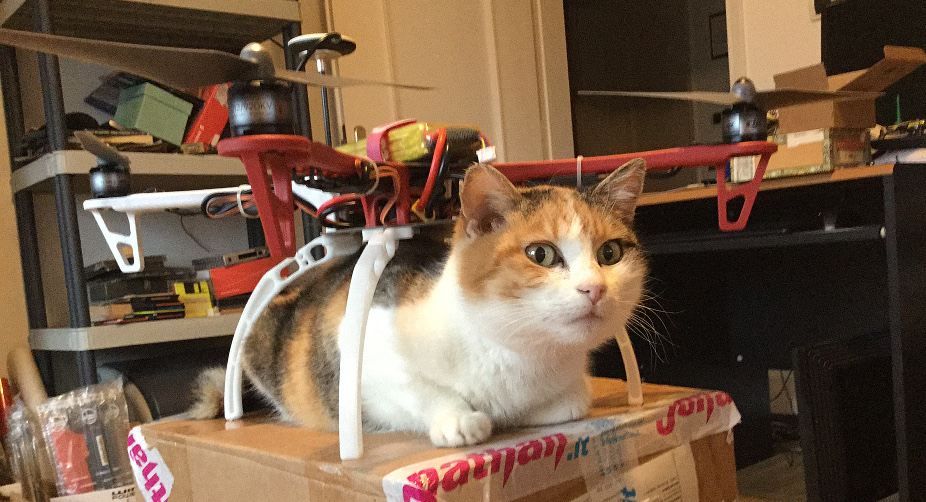
No cats were harmed in the making of this article
{jcomments on}


